|
Using a Laser Cutter
Goals
In this chapter, we will cover the basic settings and more practical aspects of laser cutting.
Content in a nutshell
There are four primary settings in laser cutting; power, which refers to the rate at which energy is emitted from the laser, speed, frequency, which specifies the number of pulses the laser makes per second, and resolution, which determines the quality of rastering.
Primary Settings
The laser cutter has four primary settings;
- Power: refers to the rate at which energy is emitted from the laser. At high power, the laser will cut through stronger, thicker material, but may end up burning more flammable stock. At low power, it might not be strong enough to get all the way through the material, but that can be compensated with a lower speed. A higher power setting will create a Darker image while rastering, due to more layers of the material being burned.
- Speed: refers to the rate at which the laser cutting head moves along its gantry. At high speed, the laser might not cut all the way through with thicker or stronger materials. At low speed, the laser will cut through but has the potential to burn or melt the edges of the material, similar to a high-power setting.
- Frequency (only for cutting): specifies the number of times the laser pulses per second. The laser turns on and off rapidly when it makes cuts, so a higher frequency will create a Cleaner cut. If the material is flammable it might catch fire at a higher frequency, therefore lowering it might be desirable.
- Resolution (only for rastering): Determines the resolution and quality of the raster operation. A higher resolution will produce a better, Darker image, but if there is too much heat concentrated in one area, it may severely melt, Burn, or damage the workpiece.
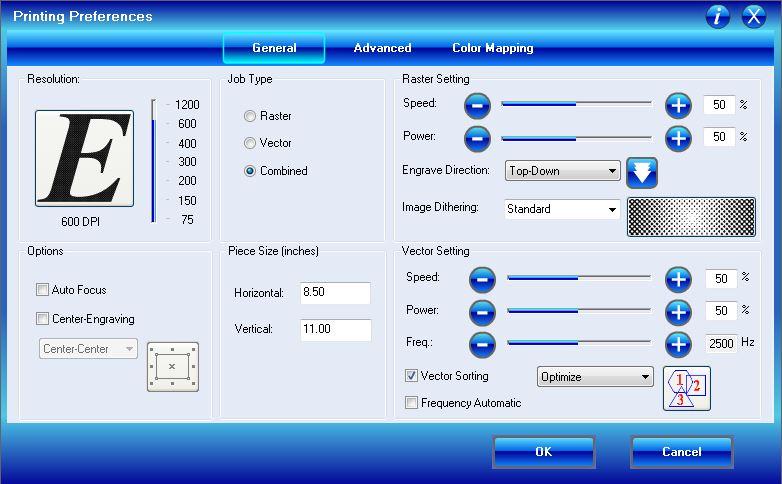
While power and speed apply to both vector cutting and rastering, frequency only applies to vector cutting and resolution only applies to rastering.
These settings are changed based on the material that is being cut; for example, a thicker material might require a higher power setting and a slower speed for the laser to cut through, while a tinner material could be cut with a much lower power and speed setting. Usually, the correct figures will be available to you as material presets in the software or you will have a physical table available that you can use as a reference in the workshop. Regardless, you will have to sometimes experiment with the settings and material thickness to achieve the desired result.
Useful Tools
You don't necessarily need any additional tools apart from your main material and some test samples when laser cutting. However, the following items might prove useful;
- Utility Knife: For cutting material that wasn’t cut all the way through by the laser cutter or to cut paper and cardboard to size for samples.
- Masking Tape: Use it for masking the surface of your material to prevent burn stains and to tape downlight materials that might move easily.
- Measurement Tape/Ruler: For measuring dimensions and making sure your final objects are on the correct scale.